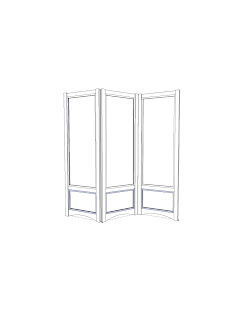
For a week I worked on the design of the frames which is made up of verticle styles and horizontal railings. Here is a photo of what they look like on Google Sketch Up. I wished I had used this system from the start. Most of my drawing were coming from graph paper and pencil.
Each panel is about 6 feet tall by 2 feet wide. Once the design was made I took my friend to Southern Lumber to look through various wood options. We both were very interested in using Lacewood for the styles and maple for the railings. However Lacewood would not be sold in the dimensions we needed and maple is a pain to work with. So we turned to the next best thing and used Walnut and Alder, both of which are pretty, relatively easy to work with and best of all... affordable. I got the wood at Jackals in Watsonville.
Luckily, my friend, Manny, from the class I take up in Oakland offered to help. His shop was by far the coolest personal workshop I had ever seen. All I had to do was tell him the dimensions I needed and he ran them through his monster tools. Im telling you he had a joiner, band saw and table saw that could run full size timber. It was amazing!
Anyways, after everything was cut, we could clearly see some pieces bowed. My friend told me if I had looked for straighter grain that wouldn't have been a problem. Oh well, you learn from your mistakes I guess. The good news was that I could still use them, I just had to be clever in orienting them in the design.
Two days later I had finished drawing all the layout lines I would need to follow for chopping the mortises and cutting the tenons by hand. I would need to chop and cut 18 mortise and tenons with 36 wedges. Probably my biggest job on the project. One year later, I can now say that task is complete. I had finished one panel a while back but had since been distracted with things like school and work. Two month ago I had finally finished paring out all the mortises to fit the wedges so I could then plane the pieces smooth and take off any layout line or power tool mark. Another one of my friends from class, Joe, offered to help assemble the last two panels. Yanik helped too which was nice.
The coolest thing about this project would be the use of negative space with wild branches. For two years I have been searching to find the right ones. They had to have a very "organic" look with lots of twists and turns but it also had to be flat. This was the hard part. We originally planed to use curly willow yet later decided that it wasn't what we were looking for. Japanese Maple was a close contender but was too weak once it dried out like the curly willow. Manzanita has an excellent natural line that we wanted and it would be strong but wasn't 2-dimensional. However, after finding some in Wilder Ranch we could not resist not using them. Their electric twists made them look like lightning bolts, a perfect work of art that had to framed. Here is a picture of what they look like resting in the panels.
My next tasks are to find a way to hinge the three panels together then have the branches secured into the frame without damaging the styles or railings. Once that is done I will look into a way to fill in the bottom frames. We were thinking of framing some nice wooden boards with an interesting grain.
I apologize for not documenting this project through all its stages. I wish I had taken more photos of the process. Next blog on this will have more illustrations. Thanks for reading.


