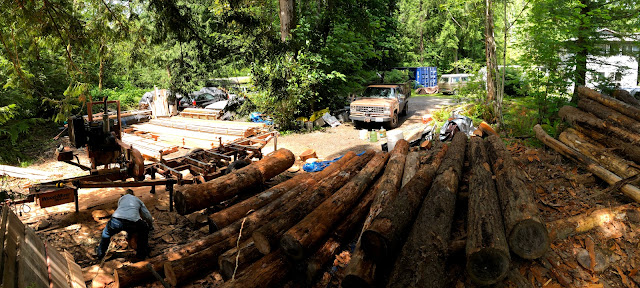
I'm back! In fashionable amount time for once. One of our projects David and I got to do for Aiki in July was work on the owners property and mill his pile of doug firs and cedars. It was a great opportunity for me to learn more about the milling process like:
- how to lay out a space with stickers to sort the cut lumber in an organized fashion so they can dry properly
- how to deal with "jackets" or the outer edges of the logs that are discarded or cut in a jig to fit a fireplace.
- how to peel logs of the bark and scrub thoroughly to make sure no grit or debris is left that might damage the saw.
- how to roll the logs with a (peevy?) and/or cant hook carefully so not to be crushed by them.
- how to maintain a efficient flow of moving lumber out into its drying location while keeping the saw going without interruption or delays.
It was a great experience working with Bri, the miller. She's a very wonderful human being and interesting person I would love to hire in the future to help me mill lumber for building my own house, should I ever have that ability.
On weekends or after work when I had some energy to spare, I continued to work on my mom's gate project.
Here is a great group of shots with Dan and I working on installing the ridge beam and purlins.
It was tricky to saw the posts flush to match the slope the roof but I enjoyed using my ryoba.
This day we worked on the rafters. It might have taken an engineer and a math major too long to remember how to do the math on finding angles using our measurements. We figured it out... but man "If you don't use it you loose it."
I really liked the exoskeleton look of the gate this early morning. Thought it looked cool framing the moon.
Here are some shots of laying the cedar tongue and groove sheathing. It was good to take Dan's advice and spend the extra cash on cedar sheathing rather than the my original idea of useing CDX plywood. The boards go well with the whole cedar theme and plywood would have cheapened it. The roofing materials werent cheap. The cedar shingles and T&G boards came to $300 for this little gate... I still have to get the copper for the ridge cap! By the end of the project we easily came to $1,000, not including labor. I have a new appreciation for what goes into well built garden structures.
There was a learning curve to nailing the cedar shingles. Having never done any kind of roofing before I had to read up and watch a few videos on YouTube. It was hard working on my little 3'x6' roof in the blazing sun. Being a wimp to the heat, so slow on my methods of nailing correctly, and my fear of ladders, I know I'd be a terrible roofer. Again, new found respect for roofing jobs done right.

Here is the latest photo of the project. Got the fence panels connected to the gate and started on the trellis'. Has a lot more strength with them fastened together. Corrected the posts from being out of plumb too. Nice.
July and August were good months to be back on the Bridlewood house. June was super wet and rainy. David and I worked mostly on re-siding the house with hardie planks and panels, and cedar trim. Here is a shot of our completed job installing a pocket door. I love pocket doors and am now familiar with the steps to build one!
Here is David and I putting up the pine T&G soffit boards.


Before I end this post, I thought I should start a tradition of signing off by acknowledging those who inspired my passion for woodworking. Below is a recent image of my grandfather fixing a chair he built a long time ago. I mention him first because I attribute him as the first person who taught me how to work with tools. I remember during 4th grade, working with my grandfather hours, building my scale model of the California mission or making tomb stones for Halloween decorations. He was the one who taught me how to use my first power tools like the drill press and scroll saw in junior high school. We built a walnut shelf and finished it with several painstaking coats of polyurethane. It was so beautiful when it was done, my shop teacher at the school didn't believe me when I told him I built it with my grandpa. He was the first to trust me with his tools and shared the joy of building things with your hands. To me, that is what I want to be at my core. A teacher who shows the joys of working with your hands. Teaching others to approach a project like an engineer but add in those artistic touches to give it your own signature appeal.
Thanks again for reading.


No comments:
Post a Comment